How to Properly Fit a Horse Saddle: Expert Tips for Comfort and Safety
Struggling to fit a saddle correctly? Our expert guide covers everything you need to know ensuring comfort for both you and your horse.
Many riders think a saddle fits right just because it stays in place. This belief misses the mark completely. The reality of proper saddle fitting tells a different story.
Your horse needs 14 specific points checked for a proper fit, ranging from tree width to wither clearance. A saddle that doesn’t fit can harm your horse severely and leave permanent muscle damage or hollow spots behind the shoulder.
The measurements must be exact. Your mounted position should allow 2 to 3 fingers of wither clearance. The distance around the withers needs at least 2 fingers of space. The tree shape must perfectly match your horse’s back to avoid problems like bridging or rocking.
Proper saddle fitting plays a vital role in your horse’s comfort and safety, regardless of your riding experience. This detailed guide will show you how to achieve the perfect saddle fit for your horse.
Understanding Saddle Anatomy and Types
The right saddle fit and function starts with a solid understanding of its anatomy. Your saddle creates a vital connection between you and your horse, and each part plays a key role in comfort and performance.
Key components of a well-designed saddle
The saddle tree creates the foundation of every saddle and helps distribute weight evenly. This wooden or fibreglass frame has two arches connected by rails that run alongside the horse’s spine. The gullet runs along the saddle’s underside and creates clearance for the spine to prevent pressure on this sensitive area.
Other key parts include:
- Panels: Padded sections that contact the horse’s back, distributing rider weight
- Pommel: Front raised portion that sits above the withers
- Cantle: Rear raised portion that helps secure the rider’s position
- Flaps/Fenders: Side portions where the rider’s legs rest
English vs. Western saddle differences
English and Western saddles have distinct designs, weights, and purposes. Western saddles weigh more and cover more of the horse’s back to spread weight evenly—perfect for long rides. They come with a prominent horn, high cantle, and deep seat built for working activities and rider comfort during long hours.
English saddles take a different approach with their lightweight, minimalist design that lets riders stay close to the horse. This proximity helps riders feel subtle movements and communicate better with their mount. You’ll find English saddles in many styles that match specific needs like dressage, jumping, and eventing.
How saddle design affects horse comfort
A good saddle design lets horses move freely without any restrictions. On top of that, it spreads the rider’s weight across the horse’s back to avoid pressure points and prevent injuries.
Scientists have found that a horse’s back expands under the saddle during proper work. The saddle must allow for this thoracolumbar expansion during exercise. Horses forced to work with restrictive saddles develop a hollow back, which affects their movement and limits their performance.
A poorly fitting saddle can cause serious problems like muscle loss, bruising, soreness, and permanent physical damage. These issues often show up as behaviour changes – horses might resist work, refuse commands, or show reduced performance levels.
Measuring Your Horse for the Perfect Fit
Proper saddle fitting starts with accurate measurements that ensure comfort for both horse and rider. Your horse’s body changes naturally through growth, weight changes, and muscle development. Regular assessment gives you a clear picture of these changes.
Essential tools for accurate measurement
You’ll need these specific tools to measure your horse:
- A flexible measuring tape or flexible curve (at least 16″ in length)
- Chalk in a colour that contrasts with your horse’s coat
- A flat surface to record measurements
- A camera to document everything
- A ruler for precise measurements
Professional fitting kits often include template cards that help assess your horse’s back.
Step-by-step measurement process
Start with your horse standing square on level ground. Mark the back edge of the shoulder blade (scapula) with chalk. This point matters because your saddle needs to sit behind it to let your horse move freely.
Take your flexible curve and place it behind the shoulder mark. Shape it to match your horse’s withers contour. The curve should stay in place without popping up – this helps you get accurate results.
English saddles need gullet width measurements. Stretch the measuring tape across your horse’s withers at their widest point. The saddle length should stop at the 18th thoracic vertebra (T18) – this marks your horse’s weight-bearing area.
Recording and interpreting your measurements
Put your flexible curve outline on paper and add your horse’s details and the date. Take measurements at three key points: three fingers behind the scapula, three more fingers behind that point, and at T18.
Match these measurements with saddle specifications to find the right gullet width and tree size.
Common measurement mistakes to avoid
Saddles that fit today might not fit tomorrow. Riders often focus too much on their horse’s fit and forget about their own comfort. Some people buy saddles without checking if they’ll work for their horse.
Channel width matters too. The right gullet size makes a difference. Using one saddle for different disciplines without adjustments can cause problems.
Evaluating Saddle Fit on Your Horse
Your saddle’s fit needs both systematic visual checks and hands-on techniques to ensure your horse stays comfortable and performs well. The right measurements matter, but the ground test comes from seeing how the saddle works with your horse’s unique structure.
The 5-point visual assessment method
Start your visual assessment with your horse standing square on level ground. These critical elements need your attention:
- Saddle position: A level saddle shouldn’t sit too far forward or back. The saddle must stay behind the shoulder blade so your horse can move freely and not extend beyond its 18th rib.
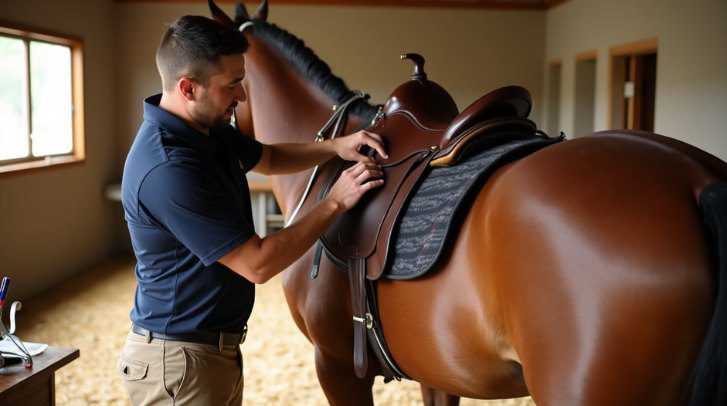
- Pommel and cantle clearance: Your saddle’s cantle should sit slightly higher than the pommel with enough clearance underneath. You can try placing 2-3 fingers under the pommel and check that the gullet space isn’t tight.
- Panel contact: The panel quality and evenness need careful assessment. Look for lumpy flocking that might create pressure points. Your horse’s back should have even contact with the panels throughout.
- Saddle movement: Check for ‘rocking’ by placing your hands on the pommel and cantle, then press alternate sides. Your horse might get sore if too much movement concentrates weight in small areas.
- Horse response: Your horse will tell you if something’s wrong. A comfortable horse has relaxed ears, focused eyes, and moves without hesitation.
Hands-on checking techniques
Your hand should feel equal, even pressure when running down the front panel—not tighter at top or bottom. Slide your palm under the saddle panels with light pressure to check for bridging. You should feel smooth, even contact without gaps or holes.
The tree points should line up parallel to your horse’s sides. Your horse’s shoulders need room to rotate freely within the tree width at the gullet plate. A saddle that’s too wide might rock side to side.
Testing fit with the rider mounted
The wither clearance needs another check once you’re mounted because it can change with your weight. Someone should verify that 2-3 fingers still fit above and around the withers.
Your position in the saddle matters—shoulder, hip, and heel should line up while keeping your pelvis square and centred. A horizontal saddle seat helps maintain your balance.
Watch how the saddle sits through all gaits. Your horse’s back dimensions change during exercise, so the saddle must adapt to these changes. Sweat patterns after riding can reveal pressure points or poor contact areas.
Fine-Tuning for Optimal Comfort and Safety
Your saddle needs fine-tuning even after proper measurements and the original fitting. This will ensure long-term comfort and safety for you and your horse. Your horse’s shape changes throughout the year because of weight, fitness, and muscle development. These changes mean you need regular adjustments to keep the fit optimal.
Adjusting tree width and angle
Tree width and angle must work together as a unit. You can’t adjust one without thinking about the other. A well-fitted saddle combines the right tree angle that matches your horse’s shoulder angle with proper width across the withers.
The saddle needs assessment without a pad to check if its piping angle matches your horse’s shoulder angle. A tree angle that’s too wide might show clearance above the withers, yet the saddle will pinch the sides painfully.
Signs of incorrect tree angle include:
- Restricted shoulder movement
- Unwillingness to move forward
- Saddle sliding forward consistently
Make tree adjustments only according to what manufacturers recommend. Some saddles come with adjustable gullet systems. These systems mainly change the angle without necessarily meeting width requirements.
Using pads and shims correctly
Shims offer temporary solutions for horses that have conformational issues like shoulder pockets or sway backs. Start with the thinnest possible shim to fix the specific issue. Too much shimming can make the problem worse.
Put shims between the saddle pad and liner. They should fill only the spaces that need it. Your horse’s body changes often, so check and reassess after every few rides. The aim should be gradual reduction in shimming as your horse builds proper muscles.
When to consult a professional fitter
Professional saddle fitting is vital at least twice yearly. Some situations need immediate professional help:
Expert guidance becomes necessary if you notice pressure marks on the withers, uneven sweat patterns after riding, or changes in your horse’s performance. A professional should also look at your saddle after major changes in your horse’s weight, training intensity, or when you start a new discipline.
Note that optimal saddle fit needs ongoing attention—it’s not something you do once and forget. A qualified Society of Master Saddlers fitter brings expertise that ensures comfort for both horse and rider.
Conclusion
A proper saddle fit is a vital element that ensures both horse and rider safety. This goes beyond simple stability and requires careful attention to multiple factors. Your horse’s comfort and performance depend on regular assessment and adjustment as seasons change and training intensifies.
You need to understand saddle anatomy, take accurate measurements, and evaluate systematically to identify problems early. Note that saddle fitting requires ongoing attention since your horse’s body changes with age, fitness level, and training intensity.
Watch your horse’s signals and behaviour during rides carefully. Any signs of discomfort require quick action – either through careful adjustments or help from a professional saddle fitter. This knowledge helps you make better decisions about saddle fit that enhance your riding experience and your horse’s well-being.

Welcome to Sell Your Horse, a platform dedicated to connecting equestrians with each other, making horse buying and selling easier and more transparent. With a focus on technology and community-building. My mission is to help like-minded equestrians find the right connections, share knowledge, and build a trusted equine network.






 Featured Listings
 Adverts
 Horses For Sale
 Tack & Equipment
 Horseboxes & Trailers
 Equine Properties
 4x4 Vehicles
 Horses For Loan
 Horses Wanted
 Stallions at Stud
 Equine Services
 Riding Holidays
